Important Guidelines for Links
1. LINK TO INTERNAL CONTENT WITH RELATIVE LINKS
To link to pages within your site (internal link), either:
- Whenever possible, use an autocomplete field to search for and select the desired page.
- Type the relative URL (e.g., "/news") into the Link field. Absolute URLs (e.g., https://yoursite-content.oit.duke.edu/news or https://yoursite.duke.edu/news) will break when your site launches at your production URL and should only be used when linking to an external site.
2. CREATE ACCESSIBLE LINKS
Avoid links that say "Read more," "See all," and "Click here" – since this provides no context for where the link is taking a user. Instead, use more descriptive link text, such as "Register for TechExpo" or "View all Events." Learn more about accessible links.
3. LINKS CANNOT OPEN IN NEW TABS
Sites@Duke Pro does not allow links to open in a new tab or window, following web accessibility best practices.
Two Ways to Add Links
Links can be added in the WYSIWYG editor and in specific content blocks containing link fields.
1. Add Links via WYSIWYG Editor
1. In the WYSIWYG editor, click the Link icon.
- You can also highlight the desired text or image to be linked, and then click the Link icon.

2. To link to pages within your site (internal link), start typing the name of a page you want to link to and select it from the auto-suggest dropdown.
- List Pages are typically listed last, so don't forget to scroll down the autocomplete list.
- Using the above methods of linking to internal content ensures you are using the relative URL (e.g., "/news"), and not the absolute URL (e.g., "https://yoursite.oit.duke.edu/news") that will break when your site launches.

3. To link to pages outside of your site (external link), simply copy/paste the link into the Add Link field.

2. Add Links via Specific Content Blocks
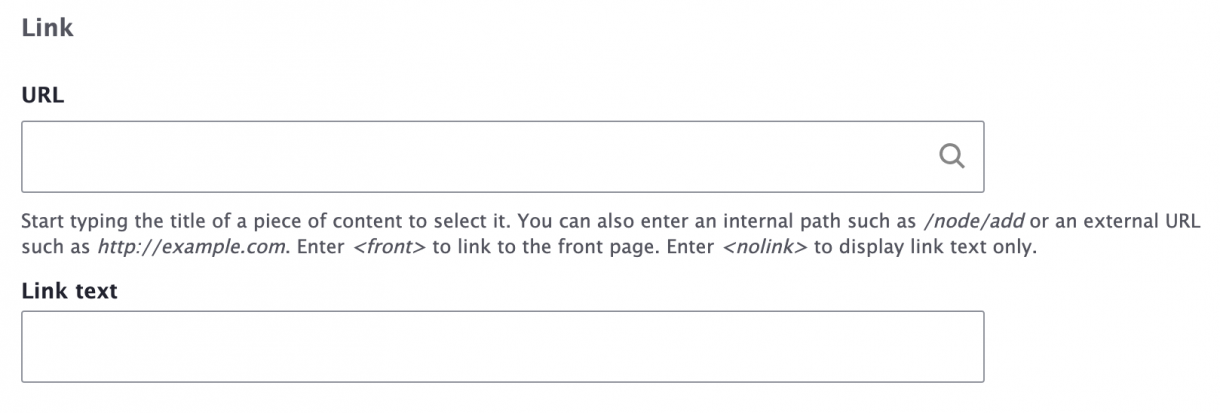
1. For content blocks that have link fields, you will need to add the Link URL. The link can be to another piece of content on your site (internal link) or to a page on another site (external link).
If there is no auto-suggest dropdown:
- Internal links: use the relative URL (e.g., "/about"), and not the absolute URL (e.g., "https://yoursite.oit.duke.edu/about").
- Links to list pages: enter the relative URL (e.g., "/news") from the List Page URLs quick guide.
2. Add Link text, which is what the link will say on the front-end of your site. Make your link text accessible so that it is clear what you are linking to.

Additional Types of Links
Anchor Links
An anchor link points to a specific point in a page's content. First, place the anchor, and then link to it.
creating an Anchor
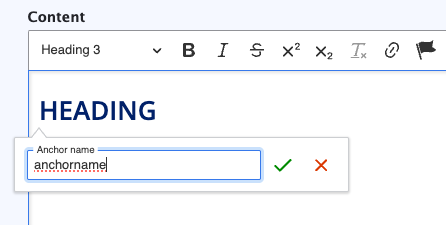
1. In the WYSIWYG editor, click on the location where you would like to add the anchor, and then click the Anchor icon (it looks like a flag).

2. In the Anchor Name field, add a short title for your anchor.
- This title will be appended to the end of the page's URL to create the anchor link. In the example below, anchor name "anchorname" will result in the URL "https://yoursite.duke.edu/page#anchorname"

Linking to an Anchor
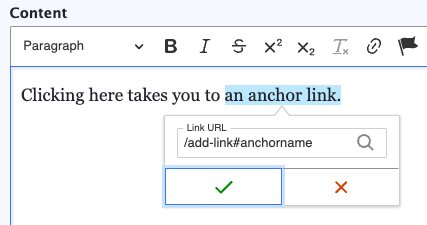
1. In the WYSIWYG editor, highlight the text that you want to link to your anchor.
2. Click the Link icon (see previous steps above).
3. Type the anchor directly into the URL field, instead of using the type-ahead functionality:
- To link to an anchor on the same page, simply type "#anchorname" (with the name of your desired anchor).
- To link to an anchor on a different page on your site, type that page's relative URL followed by "#anchorname" – for example: "/page#anchorname".
- If you are linking to an anchor on an external website, type that page's full URL instead of the relative URL path: "https://website.duke.edu/page#anchorname".
In the example below, if the URL you want to link to is https://yoursite.duke.edu/add-link, then use the following to link to your anchor: "/add-link#mediabutton".

Linking Directly to Image Files
1. In the Media Library, find the Image you want to link to, and click Edit.
2. Click on the Preview link beneath the Image.
3. Right click on the Original Image to open it in a new tab (this action may vary across browsers).
4. In the new tab, copy the URL of the original image. Note that this URL belongs to your content site, so it is only accessible on the Duke network or VPN.
5. In that URL, replace the word "content" with "files" (e.g., change "yoursite-content" to "yoursite-files"). This is now the publicly accessible URL of the original image.
6. Enter this publicly accessible URL in any link field to link directly to the image file.
Linking Directly to Files (e.g., PDF files)
There are two methods to link directly to files that live on your site:
1. Select from an auto-suggest dropdown:
- In a WYSIWYG editor, select the text you want to link, and click the Link icon.
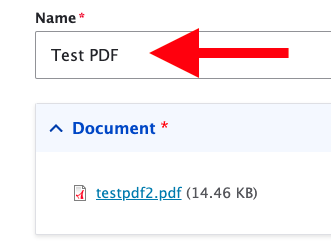
- In the Add Link > URL field, start typing the name of a file you want to link to (the Name field of the file, not the filename) and select it from the auto-suggest dropdown.

2. Enter URL into a Link field:
- In the Media Library, find the File you want to link to, and click Edit.
- Under the Document heading, click the filename link (e.g., filename.pdf). A preview of the file will open in a new window (this action may vary across browsers).
- In the new tab, copy everything after the ".edu" in the URL – for example: /sites/default/files/filename.pdf.
- Enter this value into any link field to link directly to the file.
Linking to accordions and faqs
Certain content type items do not have their own individual pages and must be linked to in other ways:
Linking to Phone Numbers
To add a clickable telephone link to your site (very helpful for mobile users!):
- In a WYSIWYG editor, select the phone number you want to link, and click the Link icon.
- In the Add Link > URL field, type "tel:+" followed by the desired phone number
- Example: tel:+9195555555"